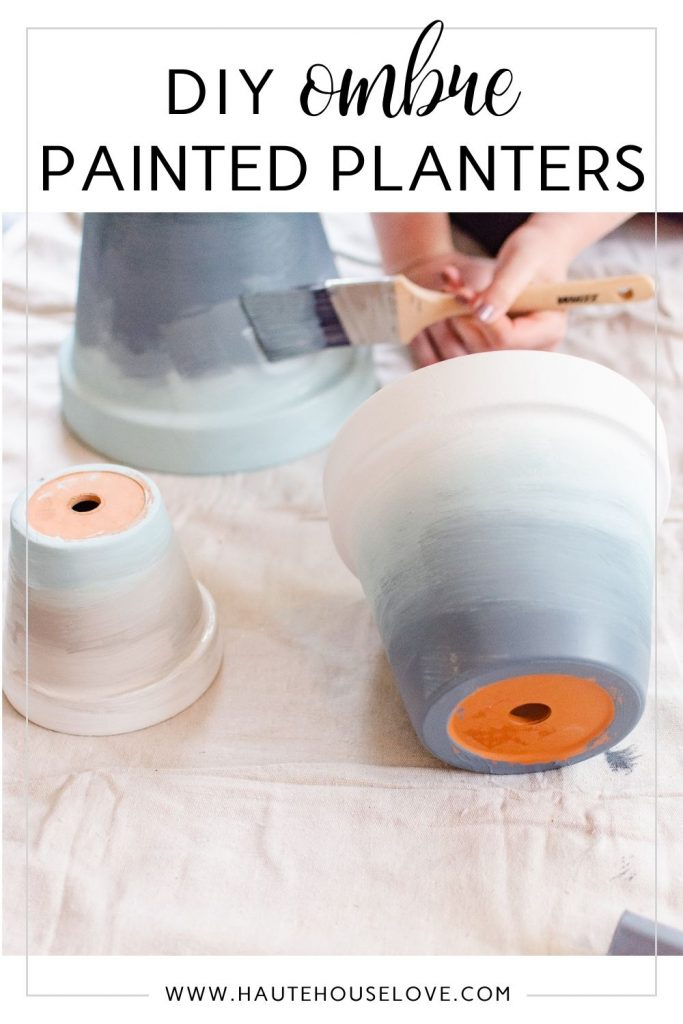
Today I’m going to show you how to take a plain old terracotta pot and paint it with an ombre effect. You will absolutely LOVE this easy DIY painted terracotta pot project. It’s a fairly quick DIY that will give you an adorable painted pot to put on display for a little curb appeal.
In the past year I’ve become brave enough to take on the responsibility of house plant mama. This is a pretty big deal for me since I tend to be one of those who somehow manages to kill every form of plant life I come I contact with.
Update: 5 Lessons I Learned as a New Houseplant Mom
But planters for said houseplants can be expensive! Especially if you want colored terracotta pots or custom planters that don’t look like everything else at the garden store.
To solve this problem I have created a simple painted planter project that you can create with an inexpensive terracotta pot and some paint. Keep reading to see how I did it!
This post contains affiliate links.
MATERIALS NEEDED FOR PAINTED TERRACOTTA POTS:
- TERRACOTTA POT: (Be sure to choose a pot with a drainage hole. Painting the pots will seal the pourers that help drain water in the first place)
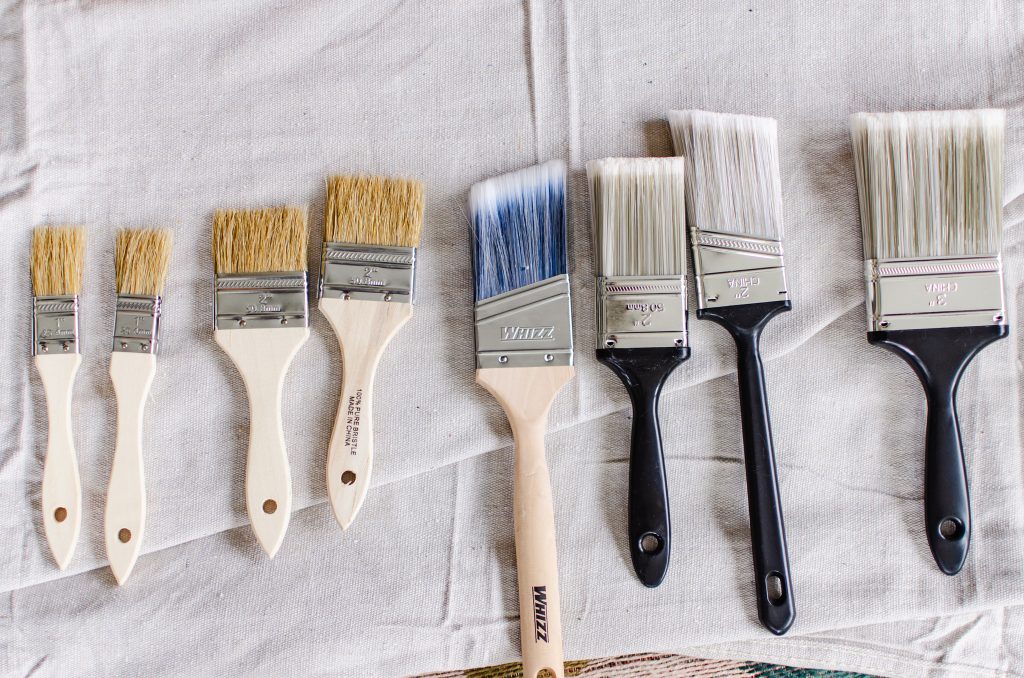
- PAINT BRUSHES: (I used a variety that I had on hand. Inexpensive, throwaway chippy brushes work perfectly for this project)
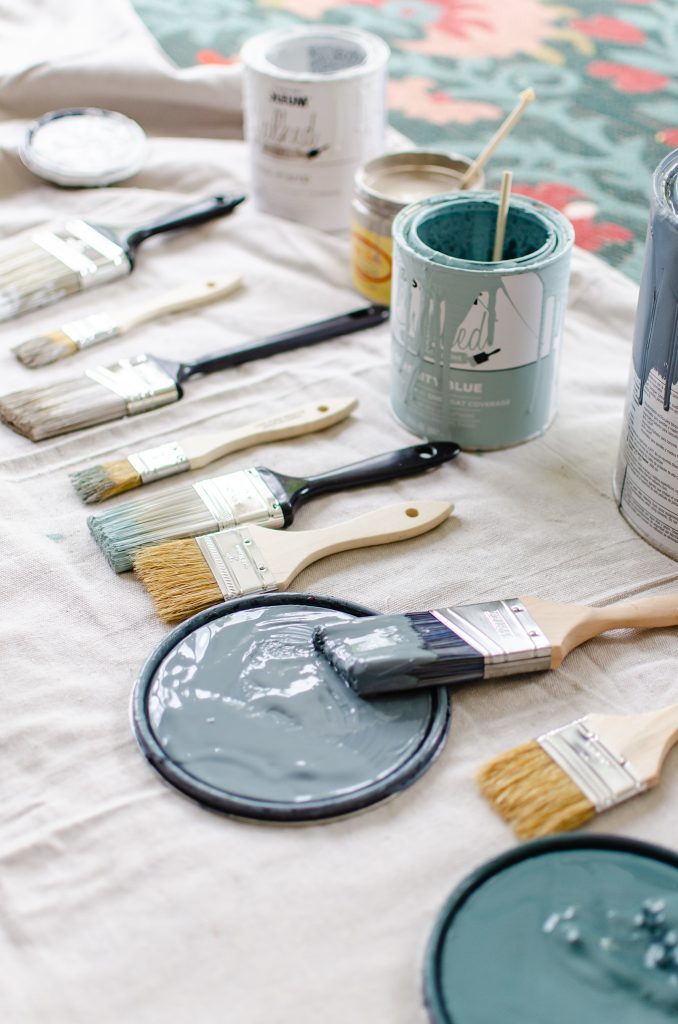
- Paint of Choice in 3 colors: (I have tried this with leftover acrylic, chalk type and latex paints that I have already on hand and all seem to work well.)
- Sealant: (I love THIS SPRAY SEALANT or WAX PASTE for chalk paint but clear POLYACRYLIC that you can brush on will work fine too)
- Drop Cloth or Old Towel
WHAT IS THE BEST PAINT FOR TERRACOTTA POTS?
The best paint to use on terracotta pots is a latex, chalk or acrylic based craft paint. They are quick drying and easy to work with and some even have a built in sealer! The good news is that these are likely paint types that you already have around your house! If not, you can easily find them at your local hardware store or craft store.
I would suggest avoiding oil based or enamel paint because it tends to be messier, harder to clean up and takes longer to dry.
WHAT IS THE BEST PAINTBRUSH FOR TERRACOTTA POTS?
You really can’t go wrong when choosing a paintbrush for this DIY painted planter project. I just used what I had on hand, which included some flat brushes and some angled brushes. If you need to buy new paint brushes, you can definitely make do with inexpensive brushes from the hardware or craft store.
Just pay attention to the size of your pot and the width of your brushes. If you’re working on a small pot, you’ll want a thinner brush. A large pot will be much easier with a bigger brush. For blending, I found a fairly thin brush worked well to really only blend along the paint line.
How to Make DIY Painted Terracotta Pots
SET UP YOUR SUPPLIES
Paint tends to dry quickly on terracotta so having everything out and ready is key to success with this particular ombre terracotta pot technique.
Place towel or drop cloth in your work area. Lay out the paint you will use and choose one paint brush for each color. Then choose two other paint brushes to use as your “blending” brushed. Lay them in between your single color brushes.
It’s key to have a separate paint brush for each color and for each blending step. If you try to reuse brushes your ombre effect won’t come out right and you won’t have time to clean the brushes before your paint dries.
DO YOU NEED TO SEAL TERRACOTTA POTS BEFORE PAINTING?
Paint will not stick to sealer, so sealing should always be done after painting! Latex and some acrylic paints have built in sealer so check your labels to see if sealing is even necessary. If you are using chalk paint they will definitely need to be sealed after. I would suggest a WAX BASED PASTE sealer or water based polyacrylic.
How to Prep a Terracotta Pot for Painting
To ensure the best results for your painted terracotta pot, it’s a good idea to spend a little time on prepping your surface. I recommend wiping down the planter with a damp cloth. You don’t want to get it too wet, just enough to get any dirt or debris off the surface of the post.
Once the pot has fully dried, you could start by painting the whole thing with a primer. While this is not necessary (you’ll see below that I didn’t use primer when painting my planters), it does add additional durability to the pots.
If you’re going to use a primer, I like to use a spray primer to save time on this kind of project. Make sure to prime the whole surface of the pot (inside and out) so that water from your plants doesn’t get underneath your paint job and cause bubbling.
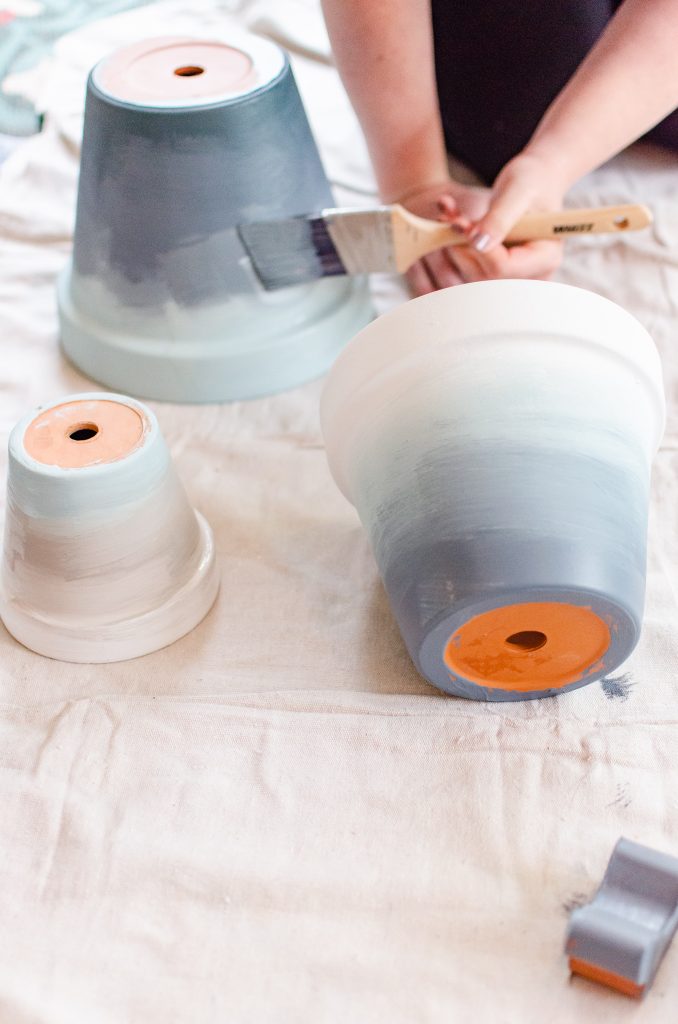
PAINTING TERRACOTTA POTS STEP BY STEP
Terracotta Painting Tips: You will have the best results if you work from lightest color to darkest color. Also terracotta pots tend to soak in paint quickly I chose to work on one side at a time.
- Step 1: Apply a thick coat of paint in the lightest color to one side of the terracotta pot.
- Step 2: Immediately add second (medium shade) color below it, slightly overlapping the light shade.
- Step 3: While both paint colors are still wet, take your blending brush and blend the lighter color into the darker color. Add more paint as needed and blend until you get an even mixed look.
- Step 4: Add third (dark shade) color to the bottom of the pot, slightly overlapping the medium shade.
- Step 5: Repeat step 3 with medium and dark shades.
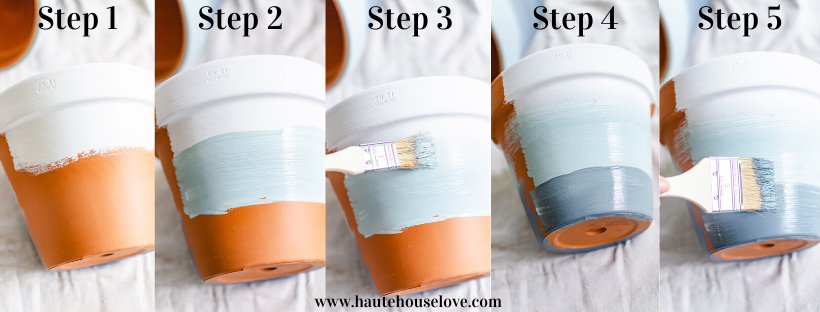
When you are happy with the colors/shading allow to dry and move onto the next side of the pot. Repeat steps until all sides are covered.
Sealing Your Painted Terracotta Pots
When painting is finished, allow it to dry and seal with spray sealant or two coats of clear polycrylic if the paint doesn’t already have a built-in sealer. Finally, transfer your plant babies into their new homes with indoor safe potting soil.
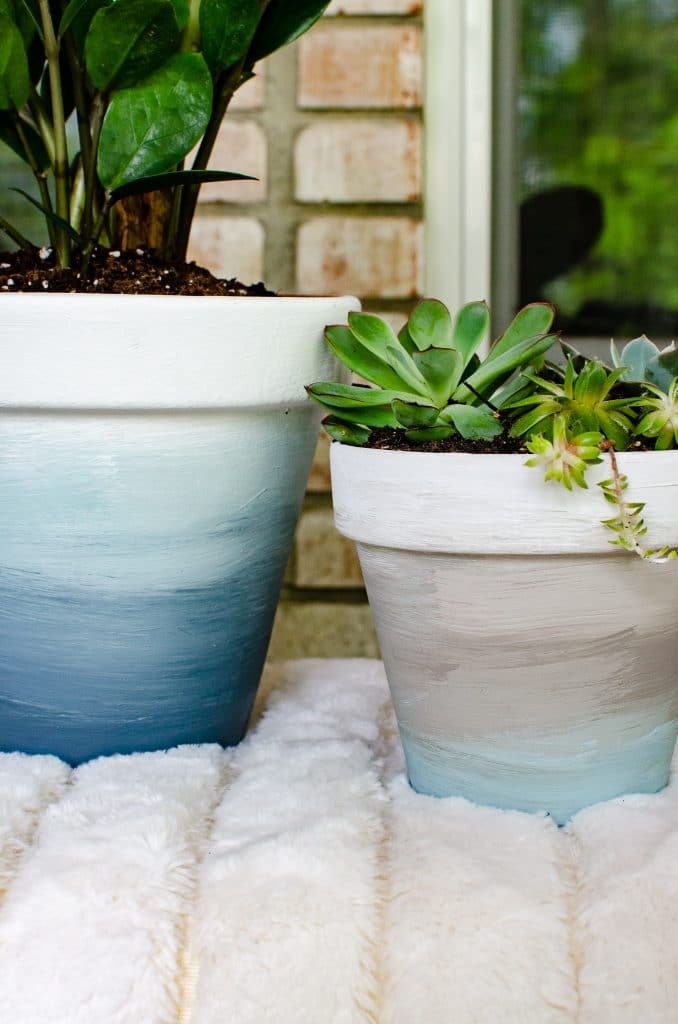
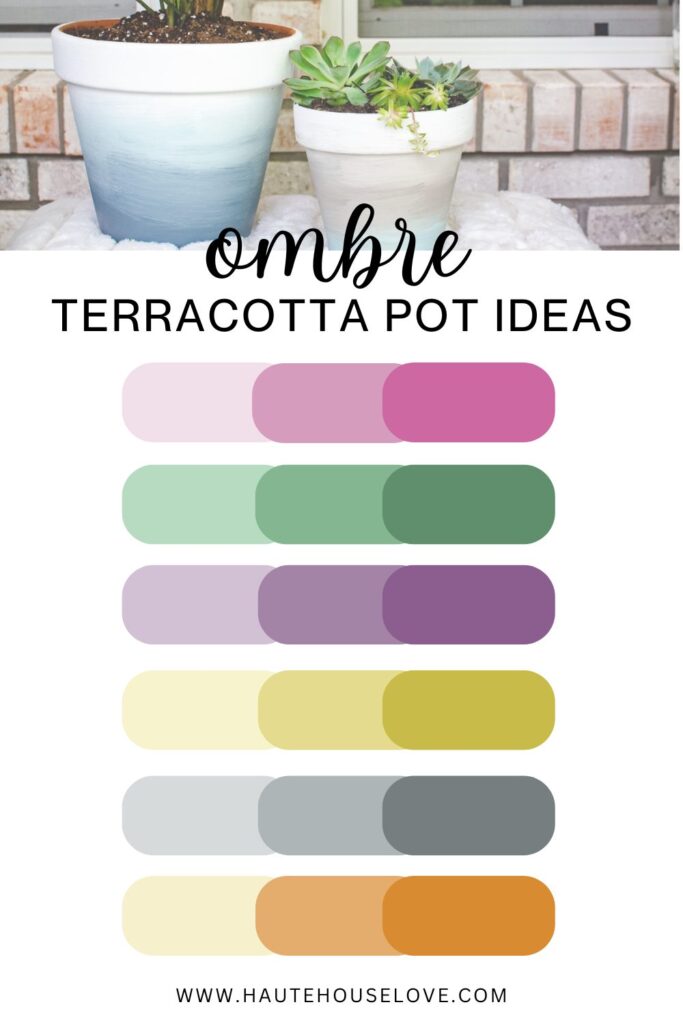
The Best Colors for Painted Terracotta Pots
The true ombré effect is created by blending one color to another going from light to dark. It typically uses one color family (like blues) but don’t let your creativity make that a hard and fast rule. Consider using a lighter tint of color for your painted planters, especially if you’re planting heat-sensitive plants. Darker colors can make your whole pot hotter and could risk damaging your plants.
I used blue paint colors for the painted terracotta pots pictured in this post, but I’d love to do this project again with other hues. Some of my favorite ideas include:
- Pink ombre
- Green ombre
- Purple ombre
- Yellow ombre (or a yellow/orange sunset look)
- Gray ombre
- Orange ombre
- Rainbow ombre
You can use this graphic as inspiration for your own DIY painted terracotta pots.
Painting Terracotta Pots for Outdoor Use
If you want to use these DIY painted terracotta pots for outdoor planting, then it’s especially important to pay attention to the quality of paint you’re using. Look for paint that is made for outdoor use, which will be water-resistant, UV resistant and very durable. You can use any exterior-grade latex or nylon paint.
When sealing a terracotta pot for outdoors, be sure to also choose a sealant designed for exterior applications.
These simple tweaks will ensure your painted planters hold up to high temperatures, direct sunlight and weather.
Painted Terracotta Pots DIY Recap:
Here’s a quick recap for you to make this painted terracotta pot project easy:
- Prepare all your materials ahead of time for this painted planter project.
- Start painting with the lightest color first. I start at the top of the pot.
- Next, add medium color below the lightest color.
- Use your paint brush to blend the paint line between the two colors together.
- Add your darkest color to the bottom of the pot.
- Use a paint brush to blend the paint line between the medium and dark shade.
- Let the paint dry fully.
- Add sealant for a long-lasting finish.
See how easy this painted terracotta pot project is? The ombré effect makes your simple terracotta pots look expensive store bought planters!
Ready to give it a go? I’d love for you to leave a comment or tag me on INSTAGRAM if you decide to try this project for yourself!

The Comments
Maryln Mixdorf
Hello! Someone in my Facebook group shared this website with us so I came to check it out. I’m definitely enjoying the information. I’m book-marking and will be tweeting this to my followers! Terrific blog and wonderful style and design.